Designers & illustrators
How to Organize Reference Images for Design Work
To organize reference images for design work, keep your original files in a searchable project folder, then choose a small working set for the decision in front of you. This guide is for designers and illustrators who need to compare composition, light or visual direction while drawing. It walks through a four-image example in FloatBoard and explains when PureRef, Eagle or Milanote may fit better.
Start with a design question, not a pile of pictures
Before adding images, write one sentence describing the decision you need to make. For example: ‘Choose a warm evening palette with a quiet, open composition.’ This gives every image a job. One might show the light, another the amount of empty space, and another the contrast between foreground and background.
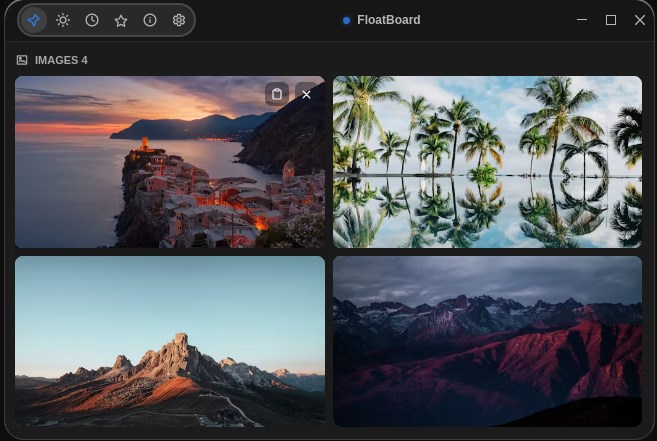
The screenshot above contains four different landscapes. For this example, the coastal sunset can be a reference for warm light, the palm scene for reflections, the mountain scene for silhouette, and the darker landscape for contrast. Those are observations to compare, not four instructions to reproduce in one design.
If you cannot explain why an image is on your board, leave it in your source folder for now. A small board that answers one question is easier to use than a larger board whose images compete for attention.
Keep reference images and notes visible in FloatBoard
- Keep the originals. Save your source files in a project folder. Treat the board as a working reference, not your only archive.
- Choose a few distinct references. Avoid filling the board with almost identical images. Pick the examples that reveal different aspects of your question.
- Add the images to FloatBoard. Use the image workflow available in your installed version. The image panel keeps the references together, as shown in the screenshot.
- Place the window beside your canvas. Use the pin / always-on-top control so the board remains visible when you return to the design app. Leave enough space for the actual work.
- Add a short reference note. In the text panel, write the design question and one observation per image. Keep copied client wording labelled separately from your own ideas; a clipboard fragment needs its source and context.
- Check readability. If important details are too small, work with fewer references or use a larger view. A tiny thumbnail is suitable for overall composition, but not fine typography or texture.
FloatBoard’s free plan has image limits. Check the current plan details before planning a larger collection; this workflow does not require filling every available slot.
Record what each reference teaches you
Images alone do not preserve the reasoning behind a design. Keep a short note in your project document with three fields: source, detail to study, and decision. For example: ‘Coastal sunset — warm highlights against a darker foreground — try a warm accent on a neutral background.’
Save the source URL and any usage or licensing information with the original. Collecting an image for reference does not give you permission to publish it. When it is time to deliver the project, choose assets you own or have permission to use.
After each design pass, write down which reference helped. If two images now serve the same purpose, keep the clearer one on the working board. This makes the next pass a focused comparison instead of another round of browsing.
Fix the common problems before adding more images
The board covers your work: move or resize it rather than squeezing your canvas into the remaining space. On a small screen, it can be more useful to compare two images at a time.
You keep collecting but do not decide: return to the opening question. Choose one visual direction, make a small draft, and compare that draft against your references. The board supports a decision; it does not make one.
You need precise color values: return to the original asset and your design app’s color tools. A scaled screenshot or thumbnail should not be treated as an authoritative color measurement.
Tools for this workflow: PureRef, Eagle, Milanote or FloatBoard?
Choose a reference image organizer by the job you need it to do. Keeping pictures above your canvas, finding an old asset and presenting a mood board are different needs. The suggestions below are based on the linked product documentation, checked on 24 September 2026; they are not a hands-on comparison or a speed benchmark. This guide is published by FloatBoard.
| Tool | Consider it when | What to check |
|---|---|---|
| PureRef | Your main task is arranging visual references and keeping them above a drawing app. Its reference-viewing features include always-on-top. | Choose the appropriate personal or commercial license. Start here if a dedicated reference canvas is your priority. |
| Eagle | You need to retrieve assets across many projects. Its organizing tools include tags, folders and smart folders. | Decide how you will label and maintain the library. A catalog and a small on-screen working set can serve complementary roles. |
| Milanote | You want to explain visual direction to someone else. Its mood boards support sharing and comments. | Check sharing permissions and plan limits before building a large client board. |
| FloatBoard | You want a small set of images beside desktop notes or copied text, with an always-on-top window while you work. | The free plan allows 5 texts and 5 images per day and one window. This image grid is not a substitute for a full asset catalog or shared review tool. |
If you arrived looking for a PureRef alternative, identify what you want to change first. For a mixed notes-and-images workspace, try FloatBoard with one task. For asset retrieval, investigate Eagle; for shared feedback, investigate Milanote. These tools are not interchangeable replacements for every PureRef feature.
Is PureRef free? Check the license before choosing an alternative
PureRef’s download page currently offers a custom contribution amount for its personal, hobbyist and educational license, and separate paid commercial options. Do not assume that personal-use terms cover paid client work; check the current download options and license agreement for your situation.
If you want to try a different workflow without paying first, FloatBoard has the limited free plan described above. Milanote’s free plan includes 100 notes, images or links and 10 file uploads. Those limits measure different things, so compare them against your actual project rather than treating either as an unlimited reference library.
Frequently asked questions about organizing reference images
What is the best way to organize reference images?
Separate storage from active reference. Keep original files and source links in project folders, use descriptive names or tags for retrieval, and bring only the images needed for the current decision onto your working board. For example, tag an image by what you need to find later—lighting, composition or material—not just “inspiration.”
Is there a free alternative to PureRef?
For a small mixed board of notes and images, you can try FloatBoard’s free plan. For a shareable mood board, Milanote has a free tier. Neither choice reproduces every PureRef feature; choose based on whether you need a visible reference, an asset library or collaboration, and check the limits above.
How do I keep reference images visible while drawing?
Use an always-on-top reference window, position it beside your canvas and switch back to the drawing app to check the layout. FloatBoard and PureRef support this approach. If the board hides your tools, reduce the working set or move it to another display.
Can I keep design notes beside my reference images?
Yes. FloatBoard’s text and image panels can share a window. Try one note containing your brief, source links and the next decision beside a few selected images. For longer written work, follow the guide to keeping reference notes visible; for interface work, see code snippets and screenshots while debugging.
Try the workflow with your next design task
Download FloatBoard, choose up to four reference images and add one note describing the decision you are making. Pin the board beside your design app, make a draft, then remove any reference that no longer helps. Keep final decisions in your project document so they survive beyond this working set.
If copied instructions are what you lose most often, explore the clipboard manager workflow. If your priority is written reminders above other windows, start with floating desktop notes. Use the board for the material you need in sight now.